Open: Procedures
Within your selected project, click on the “Procedures” tab located on the left side of the screen.
You will see a list of all procedures currently associated with your project.
To create a new procedure:
Click on the plus (+) symbol located in the top right corner of the screen.
Select “Create new procedure” from the dropdown menu.

Enter procedure details:
- Procedure Name: Enter the name of your procedure in the designated field.
- Required Procedures: If there are any procedures that must be completed before this one, select them from the dropdown list.
- Blinding (default): Choose the blinding status for this procedure (e.g., blinded or unblinded).
- Performer (default): Select the team role responsible for performing the procedure.

Adding form elements:
- You can add different elements to your procedure form by clicking on “Add the first element” in the center of the screen or using the "Add" tab on the right panel.
- Choose from a variety of form elements such as Notes, Sections, Divider lines, or specific fields like Date of Birth, Ethnic group, etc.
- Note: The fields available for selection are based on the network library, ensuring consistency and standardization across all projects.
Enter field details:
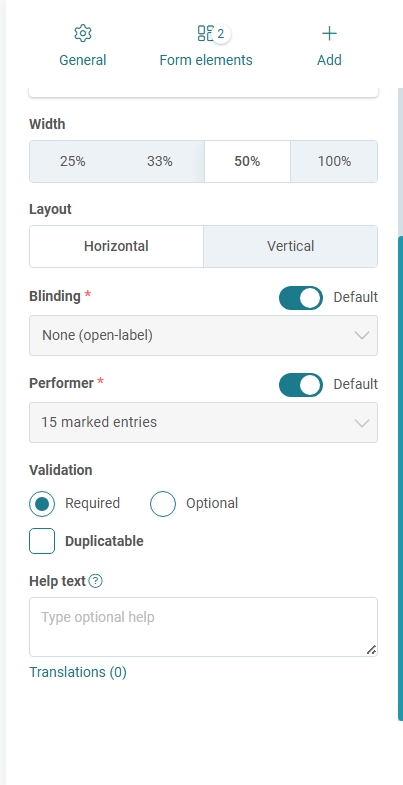
Width:
Select the width for how the field will appear in the form. Choose from 25%, 33%, 50%, or 100% to fit your layout preferences.Layout:
Decide whether the field should be positioned horizontally or vertically in relation to other form elements.Blinding (default):
Set the blinding status for this field. Use the toggle to choose if it should be blinded (hidden) or open-label (visible), then select the appropriate option from the dropdown.Performer (default):
Select the team role or user responsible for this field by using the toggle and dropdown menu (e.g., “15 marked entries”).Validation:
- Required: The user must complete this field.
- Optional: The field can be left empty.
-
Duplicatable:
Check this box if users should be able to duplicate this field for multiple entries.Help text:
Enter any additional instructions or information for the user. This help text is optional and intended to support users in filling out the field correctly.
Translations:
You can provide translations for the help text, allowing the instructions to be displayed in multiple languages for users.

Preview your procedure:
- Before saving, you can check how your procedure will appear by clicking on the “Preview as” button located at the top right of the screen.
- This allows you to see the procedure from the perspective of different roles or users, ensuring the form appears correctly for all involved.

Finalize the procedure:
Once all required details and elements are added, toggle the procedure to Active if you wish to make it available immediately.
Click Save to complete the process.
Was this article helpful?
That’s Great!
Thank you for your feedback
Sorry! We couldn't be helpful
Thank you for your feedback
Feedback sent
We appreciate your effort and will try to fix the article